Registration via DPA
You can register for courses directly from the Degree Progress Audit (DPA) if your institution has enabled this feature, which provides the following functionality:
-
Students select required and/or elective courses and initiate registration without leaving the DPA while the system checks eligibility (for example, registration locks, registration groups, holds).
-
Students view available class sections for the selected course in current or future terms.
-
Students register for a class section while the system checks registration conditions for the selected class section (for example, seat availability, time conflicts, prerequisites, corequisites, registration relationships).
-
Students receive confirmation when the registration process is complete (success/failure)
Important: The Azure Entra configuration must be completed for any customer using the New Registration Experience (NRE) feature before proceeding. For details, refer to Azure Entra Configuration for NRE.
Administrator Notes: In version 26.0.0 and later, the Registration from DPA in Portal option in Anthology Student under Settings > Academic Records > General enables institutions to choose whether to allow course registrations directly from the DPA. When the setting is configured to Yes, eligible students can register for available courses directly from the DPA. The default setting is No, and the Registration button is not displayed in the DPA. The setting can be modified only by users with the Academics - Settings - Manage permission.
You also need to enable the Allow Enhanced Pre-requisite and Co-requisite Feature setting (Feature Name: "EnableEnhancedPreReqCoReqFeature") under Settings > System > Advanced Features.
When both settings are enabled, the Registration button is displayed in the list of required and elective courses in the DPA. This new functionality will coexist with the current registration process. Its purpose is to pilot a new approach and incorporate feedback to inform the broader transformation of the registration system.
Procedure to Register via the DPA
-
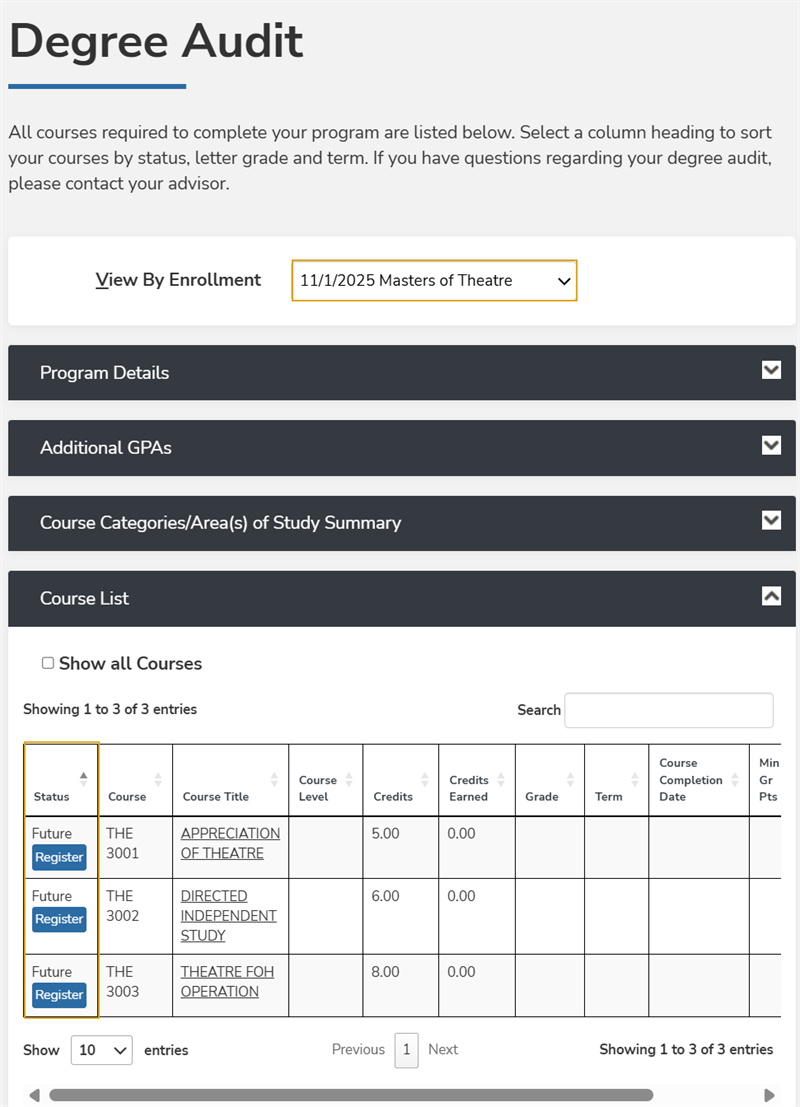
Navigate to My Academics > Degree Audit.
-
In the View by Enrollment list, select a program for which you have enrolled.
-
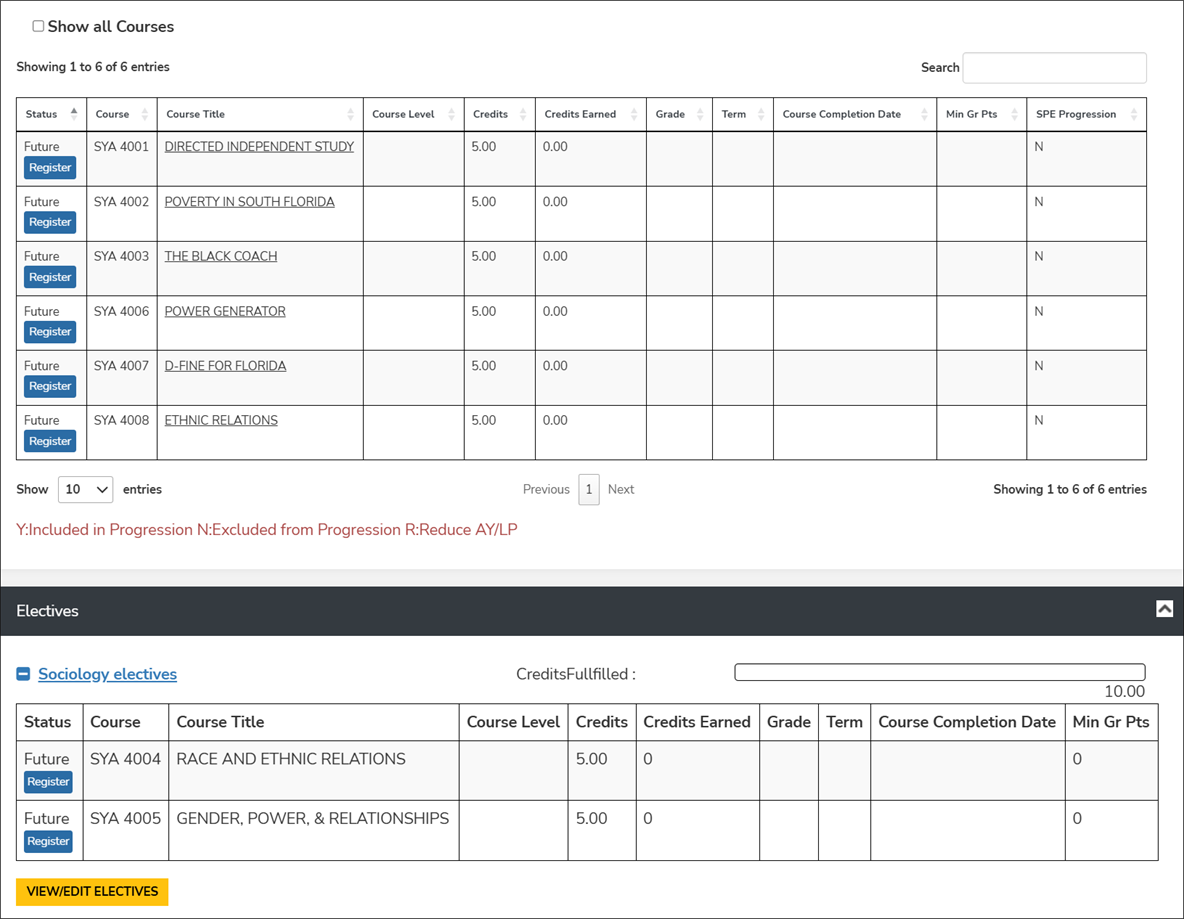
Expand Course List, Electives, and/or Courses Not Applied, find the course you want to take, and select the Register button. The Register button is displayed only for courses in Future status. The button is not displayed for previously registered courses in the Scheduled status.
At this point, the system performs a series of eligibility checks before displaying the course section details. A message will indicate the result of the eligibility check.
-
If you do not receive a message, proceed with the next step.
-
If you receive a message, determine the action to take. Refer to the following table.
 Eligibility Check Results
Eligibility Check Results Message Action to Take Your registration window hasn't opened yet for this term.
Contact your institution's administrative office for more information.
Contact your institution's administrative office for more information.
Administrator Notes: Online registration can be enabled or disabled in Anthology Student under Configuration > Registration Groups. Select the "Online Registration" check box to enable it.
Registration access unavailable due to registration hold. 
Contact your institution's administrative office to resolve the hold. You may need to submit specific documentation, pay outstanding fees, or resolve other administrative issues.
Administrator Notes: If your institution uses track registration (Configuration > Academic Records > Registration Tracks), an administrator with appropriate permissions can override the registration hold in Processes > Academic Records > Registration> Track (tab).
Registration locked for this term. You can’t add, withdraw, or unregister from courses in this term because your schedule is locked.
Administrator Notes: A schedule lock is a registration lock that applies to an individual student. It is configured in Anthology Student under Student Profile > Academic Records > Registration Lock > Lock Type = Schedule Lock.
Maximum number of credits/hours exceeded 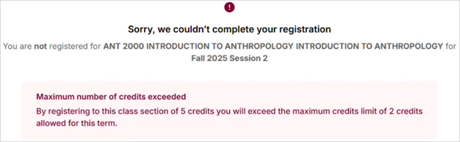
You have reached the allowed number of credits or hours for your program of study. You cannot register for this class.
Administrator Notes: A schedule lock is a registration lock that applies to an individual student. It is configured in Anthology Student under Student Profile > Academic Records > Registration Lock > Lock Type = Maximum Limit Lock.
You haven't met one or more requirements for this course: [list of prerequisites and/or corequisites] Example of failed prerequisite and corequisite validation:
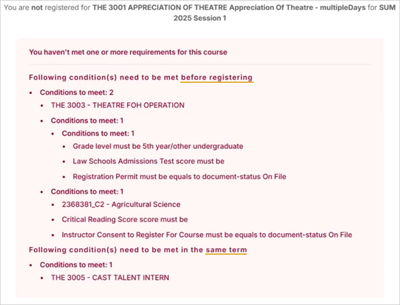
Example of a failed corequisite validation (after the prerequisite for the same course has been waived):
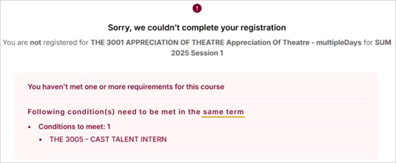
Register for the required courses listed in the message.
Administrator Notes: Prerequisites and corequisites can be configured (assigned and waived) in multiple areas under Configuration > Academic Records, depending on whether the Allow Enhanced Pre-requisite and Co-requisite Feature is turned off/on:
- Courses > Prerequisites/Corequisites (Advanced feature = off)
- Course Requisite Rules (Advanced feature = on)
- Courses > Requisites (Advanced feature = on)
You have reached the maximum number of allowed attempts for this course. You cannot retake this course. Contact your academic advisor. You can register for this course, but in doing so, you will exceed your elective pool amount by X credits. These additional credits may not progress you towards completion of your degree. It may impact your tuition and financial aid. 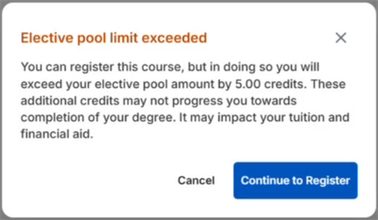
This is an alert that the additional credits for the class will not count towards your degree and may impact your finances. You can cancel the registration or proceed.
Administrator Notes: The elective pool limit exceeded warning is triggered when a student exceeds the credit limit for elective pools and "Display Elective Pool Warning During Registration" is selected in Settings > System > select a campus > the Academic Records > Advising (tab).
Your registration window hasn't opened yet for this term. Contact your institution's administrative office for more information. No terms available This course is not available for registration for any future term. This class may include additional steps to register; registration is only available on the portal's main registration page. You cannot register for this class from the DPA page. Select the link to the registration portal and proceed with your registration on the main registration page. The registration period ended on [End Date] at [End Time]. Registration is no longer available. This course is also offered as [list of cross-referenced courses] This is an informational message. You can proceed with the registration or select one of the listed cross-referenced courses if desired. This class section has class requirements that need to be met in the same term [list of conditions] Register for the classes that are required in the same term before you try to register for this class. The selected class conflicts with other registrations: [list of conflicting classes - course codes] 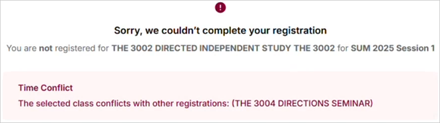
Select a class section in a different time slot or term. The class section has reached its maximum capacity. 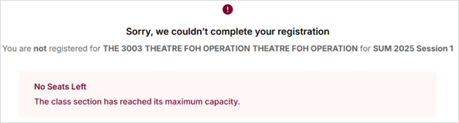
Select a class section that has seats available.
This message will also appear when:
-
A student unregisters, and a minimum number of students is required in the class.
-
A cross-listed section has reached maximum capacity.
Administrator Notes: The configuration of the minimum class size is done in Student Profile > Academic Records > Registration Locks with a Lock Type value of "Minimum Limit Lock".
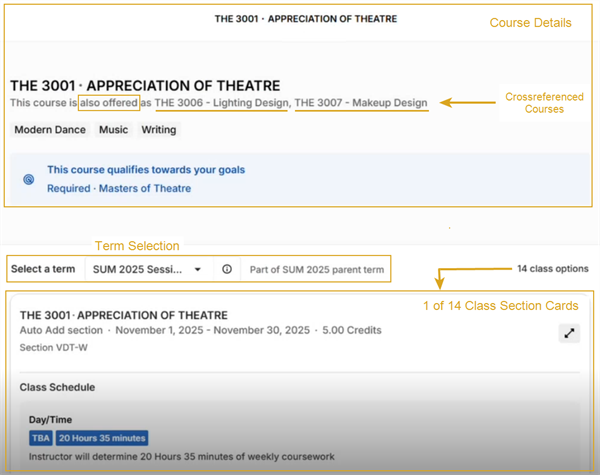
After you have passed the eligibility check, the page displays the following:
- Course details (name, code, attributes, program)
- Term selection drop-down
- Cards with details about the class sections for the course
-
-
Select a Term to filter the class sections by term. Child terms are marked as "Part of <> parent term".
Review the class sections available for the selected term.
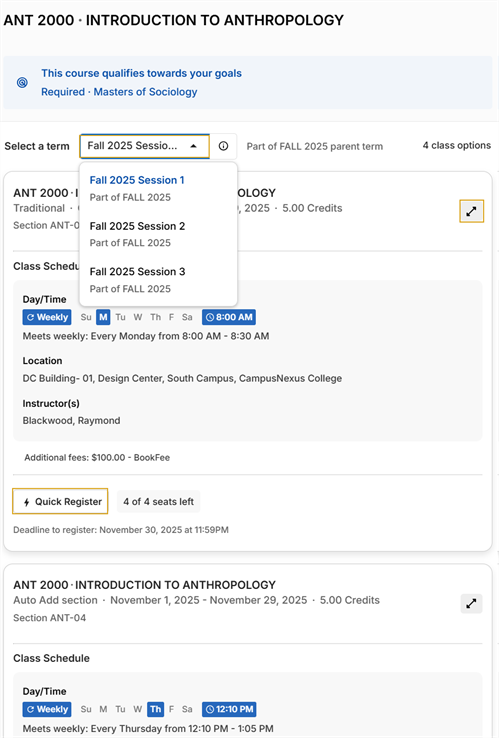
Administrator Notes: The visibility of terms in the drop-down list depends on whether:
-
The term's current date and time is equal to or falls within the Publish Start and End Dates and Times (Anthology Student: Processes > Academic Records > Online Registration Configuration > Publish Schedule > Publish Start and End Date)
AND
-
The term is active (Anthology Student: Configuration > Academic Records > Terms > Active)
Closed terms will not be listed (Anthology Student: Processes > Academic Records > Close or Reopen Terms)
The Term Relationship Configuration in the Portal Configuration tool under Campus > Term Relationships determines whether the Terms drop-down shows standard terms and child terms or only standard term.
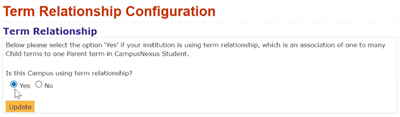
When the Term Relationship is set to:
-
Yes, all parent and child terms are listed in the drop-down, sorted by start date. "Part of” indicates the name of the parent term.
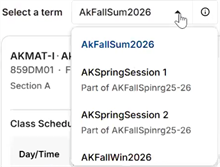
-
No, the drop-down lists only standard terms, sorted by start date.
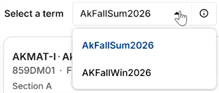
The Term selection respects the Portal configuration (no impact of Page Transaction level configuration for now):
-
When Term Relationships is enabled, the drop-down displays only eligible child terms.
-
When Term Relationships is disabled, the drop-down displays standard terms.
You can also select the information icon (
 ) next to the drop-down to view more details about the term.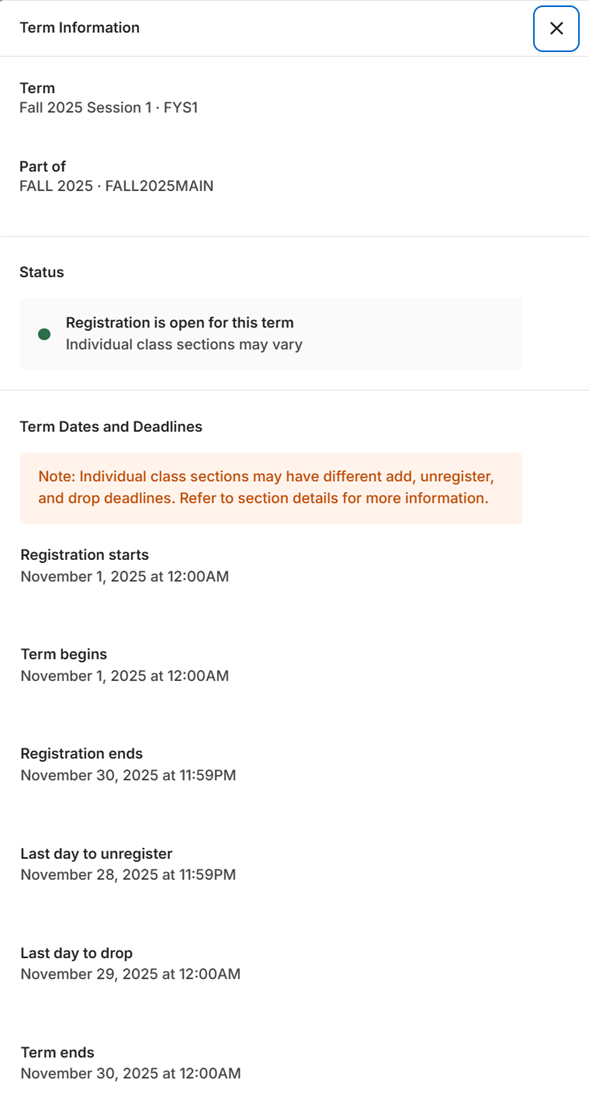
Administrator Notes: All the dates shown in the Term Information details are retrieved from Anthology Student: Processes > Academic Records > Online Registration Configuration.
The page displays one or more class sections available for the selected course in the selected term. The class section details include the:
-
Schedule type, e.g., Various Days and Time (VDT), Student Specific Meeting (SSM)
Each class section card provides the following details:
-
Section Name/ID
-
Section Code (if available)
-
Start and end date
-
Grading type for the class section, e.g., Non-Pass/Fail, Pass/Fail, or Choice)
If the grading type is Choice, the Quick Register button is disabled and the following message appears: Open the detail view to update the Grading Type before registering.
-
Select the expand icon (
 ) for the detail view and choose a Grading Type (Non-Pass/Fail or Pass/Fail).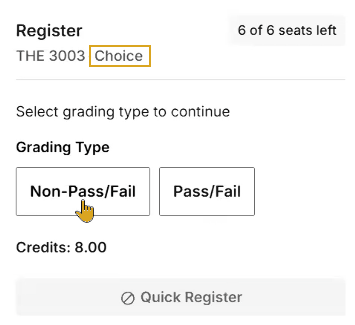
-
Once you have selected the Grading Type, the Quick Register button will be enabled, and can proceed to register.
Administrator Notes: The registration process saves the Grading Type selected by the student in the Anthology Student web app under Student Profile > Academic Records > Student Courses. If the student selected Non-Pass/Fail, the Pass/Fail Course check box will be cleared on the Student Courses tab, and the Final Grades tab will show the letter grades configured for Non-Pass/Fail Grading Type. The Enrollment record will store the Grading Type chosen by the student.
-
-
Schedule type and frequency pattern, for example:
- Single Session
- Multiple Schedules
- W (Weekly) — days of the week with start and end time
- M (Monthly) — with frequency pattern
- On a specific date — Date with start and end time
- TBD, hours of coursework — To be determined by students (also known as a Student Specific Meeting (SSM) schedule)
- TBA, hours of coursework — To be announced by instructor (also known as a Various Days and Times (VDT) schedule)
-
Location (campus, building, and room or online)
-
Instructors
-
Count of seats available or label indicating that the class is “Full.”
-
Credits (fixed or variable)
If the section allows variable credits, the following message appears: Open the detail view to update the Credits before registering.
-
Select the expand icon (
) for the detail view and choose a value from the range of credit options (minimum to maximum) in a drop-down. 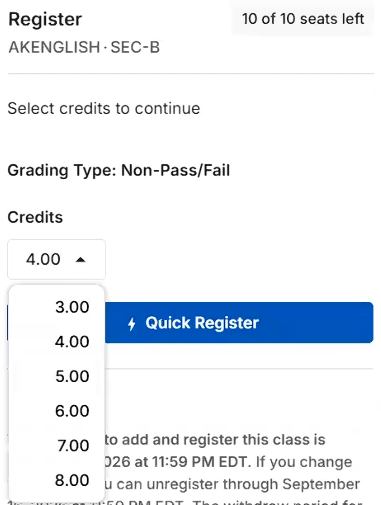
-
Selected the number credits you want to achieve and proceed to register.
Administrator Notes: The registration process saves the credits selected by the student in the Anthology Student web app under Student Profile > Academic Records > Student Courses.
-
-
Delivery method (online, hybrid, in-person)
-
Fees
-
Quick Register button (if eligible)
Administrator Notes: The class section details are retrieved from Anthology Student under Class Scheduling > [select class section], General tile, Schedule tile, Fee Schedule tile, etc., as applicable.
The class section cards are sorted by seat availability (open sections first, full sections last) and scheduled start date (earliest date first, latest last).
If a course does not have any available class sections, the following message appears: "This class is not available to register for any future term."
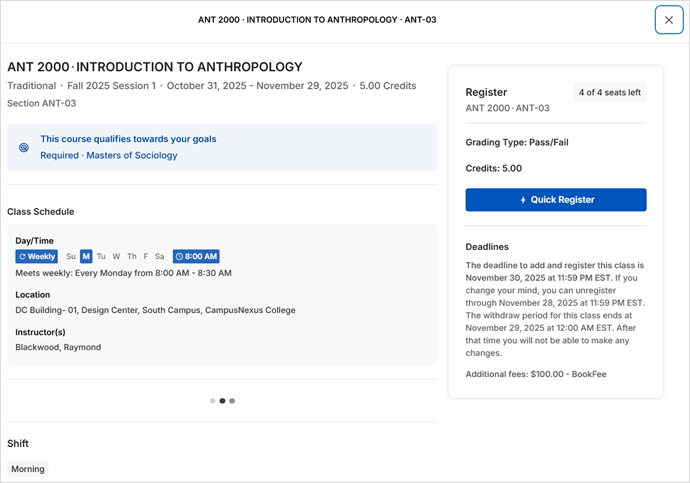
You can also select the expand icon (
) to view the details for the chosen class, including:- Course description
- Section Code (if available)
- Prerequisites/Corequisites
- Crossreferenced courses (marked with "Course also offered as")
- Skills
- Course Attributes
- Seat availability
- Grading Type
- Credits
- Registration deadlines
-
-
Select the Quick Register button on the class section card of your choice.
The Quick Register button is enabled if:
- At least 1 seat is available AND
- A waitlist is not required for enrollment AND
- The section does not use Student Choice Grading AND
- The section is not a variable credit class AND
- The end date and time to add classes have not passed.
The Quick Register button is disabled if:
- The section is full, and there is no waitlist.
- The section is full, and a waitlist is available.
- The section uses Student Choice Grading.
- The section is a variable credits class.
- The end date and time to add classes have passed.
- The Grading Type is Choice and you have not selected an option.
When condition b, c, or d occurs, the following message appears: "This section requires additional steps to register. Please use the full registration process.” You will need to proceed with your registration on the main registration page.
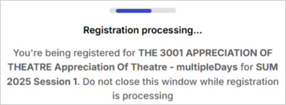
While the system processes your registration and performs validations, a progress bar with the following message is displayed. Do not close the window.
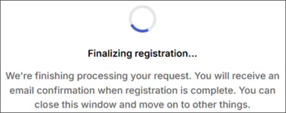
If the validations are successful, the following message is displayed. You can now close the window.
-
Once the registration is completed, you will receive a notification on the DPA page indicating success or failure of the registration.
If the registration is successful, the course will be added to your schedule.
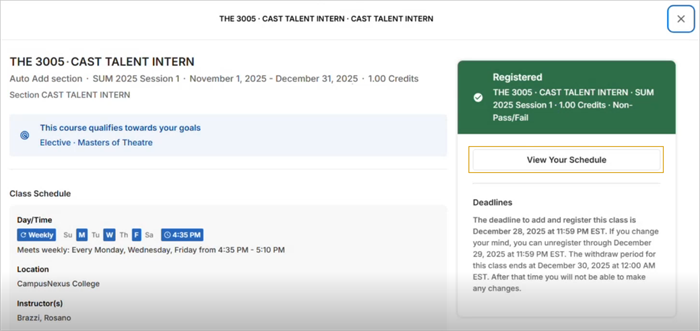
Select the View Your Schedule link to access your schedule and note that the class is added.
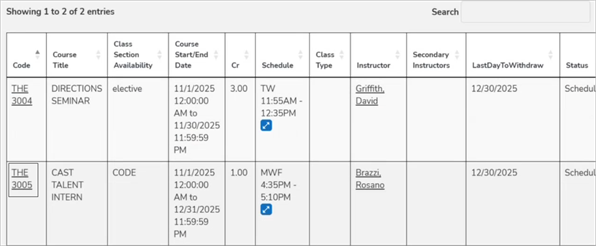
Depending on your institution's policies, you may also receive an email or SMS message.
Administrator Notes: For the student to receive an email message upon failed or successful registration, the following items need to be configured in Anthology Student:
-
In Configuration > Contact Manager > Task Templates:
-
Registration Completion: Event Type = Email Student, Subject = Registration Successful, Email Message = customized message.
Example: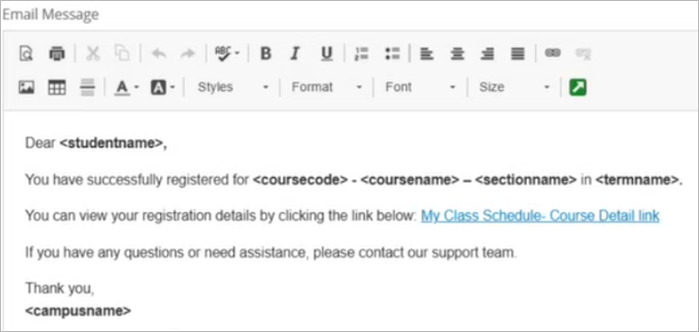
-
Registration Failure: Event Type = Email Student, Subject = Registration Failed, Email Message = customized message.
Example: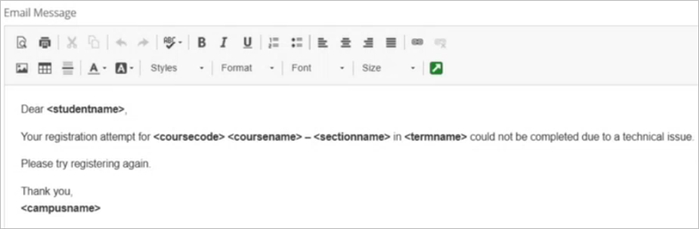
-
SMS Registration Completion: Event Type = SMS-Text Message, SMS Message = customized. Example: Successful registration. Thank you.
-
SMS Registration Failure: Event Type = SMS-Text Message, SMS Message = customized. Example: Failed registration. Please try again.
-
-
In Configuration > Contact Manager > Task Schedules
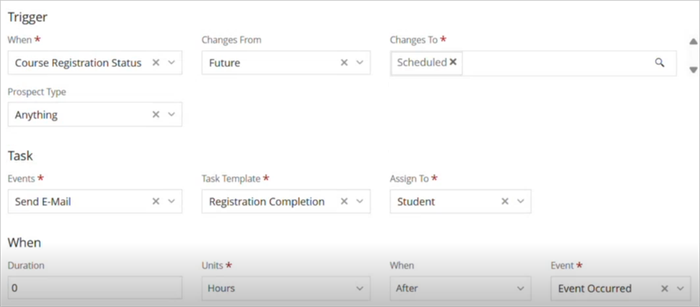
The Task Schedules Course Registration Failure, Course Registration Success, SMS Registration Completion, and SMS Registration Failure have been created to trigger the messaging when the events specified in the Task Templates occur.
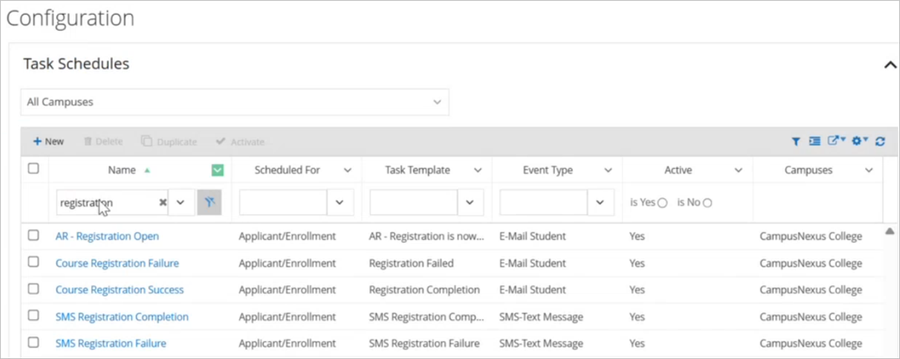
Institutions have the option to modify the details of the Task Schedules. The default settings for the Course Registration Success event are shown in the image.
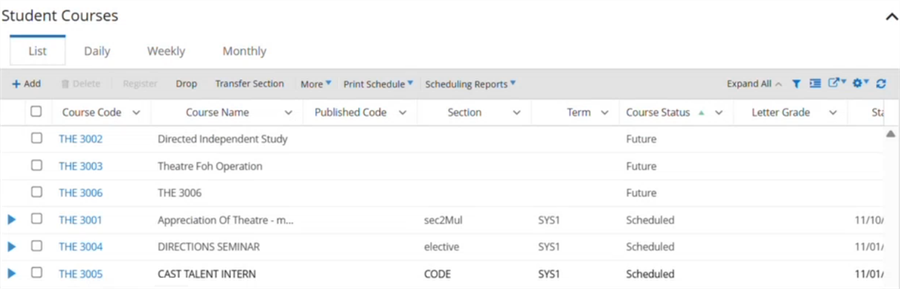
Upon successful registration, the courses will appear in Anthology Student under Student Profile > Academic Records > Student Courses with a status of Scheduled.
The Course Status Changes tab in Student Profile > Academic Records > Audit will show the registrations and status changes. The "Modified By" field will indicate "Portal Web User". The "Action" field will indicate "Registration.
-
