Student Statuses & Colors
Use the Student Statuses & Colors tab from Status Changes page to:
-
Add or edit the student statuses
- Edit the color to emphasize the status category of the current student
Prerequisites
Authorizations:
-
System - Settings - Manage
To edit an item associated with multiple campuses, you must have access to all assigned campuses. If you have access to only some of the campuses, you can view the item but cannot edit it. When adding an item, you can select only campuses you can access.
You should also be familiar with the Background for Status Changes.
Access
Settings > System > Status Changes
Add or Edit Items
-
Select the Student Statuses & Colors tab.
-
To filter the list, specify the following value.
-
To:
-
Add an item, select New or Add
-
Edit an item, select its name
-
-
Review, specify, or change the values.
-
Save your changes.
Configure a Student Status for Withdrawn with Ability to Register
You can configure a student status that reports the student as withdrawn, but keeps the student active so that they can log into Student Portal to register for courses. When an active student is changed to this school status, Anthology Student will treat the status change as an official or unofficial withdrawal in the appropriate locations. For example, in:
- Determining the NSLDS Withdrawal Date and Date of Determination
- Financial Aid (such as canceling any future aid)
- Student Accounts (such as refund calculations)
- Reporting (such as enrollment reporting and Clearinghouse)
The student can log into Student Portal to register.
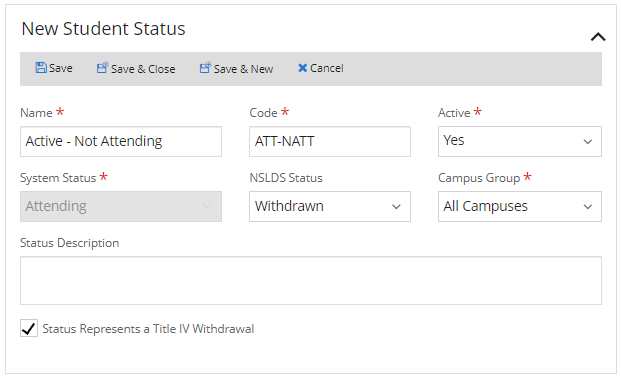
To configure the status, you must select:
- Attending for System Status
- Withdrawn for NSLDS Status
- The Status Represents a Title IV Withdrawal check box
Example
The example shows a student status of withdrawn with ability to register.
Update Status Category Colors
You can use the Student Statuses & Colors tab from the Student Statuses page to edit the color to emphasize the status category of the current student.
-
Select the Student Statuses & Colors tab.
-
Select Update Status Category Colors.
-
In the dialog, review, specify, or change the value Lead
 .
. -
Select the options to configure the following lists.
List Options Degree Seeking Colors
Non- Degree Colors
Active
Enrollment
Never Attended
Permanent Out
-
Select Save to save the changes.
Delete or Deactivate Student Statuses
You can delete or deactivate student statuses.
- Deleting an item permanently removes it. No record of deleted list items is maintained in Anthology Student.
- Deactivating an item keeps a record of it in Anthology Student (preferred). It can no longer be assigned to a student or record but remains assigned as it was previously.
If an item:
- Is not associated with a student or record, you can delete or deactivate it
- Is associated with a student or record, you can only deactivate it
- Is associated with Automated Awarding, you cannot delete or deactivate it
Delete Items
- Highlight the item.
- Select Delete on the toolbar.
The item is:
- Removed from, and the list is redisplayed
- No longer available for selection
Deactivating Items
There is more than one method for deactivating an item.
| Method | Procedure | Result |
|---|---|---|
| Using a button |
|
The item:
|
| Editing the item |
|
Because the item is not removed, you can also make it active again by selecting Activate.
