Manage Batches
Use the Manage Batches page to perform the following actions on 1098-T batches:
-
On the Selection Criteria tab:
- View, add, and delete batches
- Lock and unlock batches
- Change the Box 3 status for batches
-
On the Student Review tab, view the list of students in a 1098-T batch and add students.
The Student Review tab is enabled only when you select a batch on the Selection Criteria tab and select View All Students (Batch mode) or View Individuals (Individuals mode).
Depending on the view mode and batch status (locked/unlocked), you can:
- Add and remove student records
- View and edit student record details
- Print and make 1098-T forms available in the Student Portal
- Export records for submission to a print service or the IRS
- View reports
-
On the History tab, view the status of 1098-T export jobs.
Financial Aid Processes File Management
Use Processes > System Administration > Financial Aid Processes File Management to upload and download files in Azure File Storage. This functionality allows you to place files where financial aid processes, such as Application Data Import/Export, Clearinghouse, and NSLDS Reports, expect them. Refer to Financial Aid Processes File Management.
Prerequisites
Authorizations:
-
Common - Processes - View
-
Regulatory 1098T - Processes - Manage Batches - Manage Batch Data
Configure campus-level security for Manage Batches so users see only records for their assigned campus on the History tab:
-
In Settings > System > Campuses > Campus Groups, create or select a Campus Group containing only the campus that the user can access.
-
In Settings > System > Staff, select the staff member and assign that Campus Group on the General tile.
Access
Processes > IRS 1098-T > Manage Batches
Manage Batches
Start with the Selection Criteria tab. The Batches section on this tab is expanded by default.
Selection Criteria Tab
The Selection Criteria tab displays all 1098-T batches for the current year. To view batches from previous years, clear the Year filter and apply the desired filter.
 Batches
-
Review the record values.
By default, the rows are sorted in descending order by Year (primary sort) and TCC number (secondary sort).
-
Sort and filter the list of batches as needed depending on the action you want to take.
Task Action to Take Result Lock a batch
Select the check box in the Locked column.
You must lock a batch before you can use it to:
-
Generate an electronic file for the IRS
-
Display 1098-T records on the Student Portal
-
Configure acceptance tracking
TIN Warning
For 1098-T files submitted to the IRS, institutions must make a good-faith effort to obtain a student's TIN. When TIN Solicited is selected, the institution certifies that it has requested the student's TIN.
For tax year 2022 and later, a warning is displayed when you lock a batch or generate an IRS export if the batch contains students who do not have an SSN and whose TIN Solicited check box is not selected.
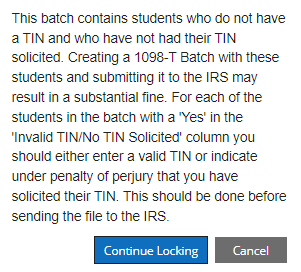
When the warning is displayed:
-
Select Continue Locking to lock the batch and update the TIN Solicited check box before generating the export file.
— OR —
-
Select Cancel to prevent the batch from being created and proceed as follows:
-
Select View All Students in the grid toolbar to return to the Student Review tab.
-
Sort the records in the Student Review Batch grid based on the "Invalid TIN/No TIN Solicited" column or export the records to Excel and then sort the records.
The "Invalid TIN/No TIN Solicited" column:
-
Is blank for all students that have an SSN on file AND have the "Solicited TIN" flag selected
-
Has a value of "Yes" for all students that do not have an SSN on file AND do not have the "Solicited TIN" flag selected
For records with a "Yes" in the "Invalid TIN/No TIN Solicited" column, take the needed steps to solicit a TIN or navigate to a student's record and add an SSN.
If you add an SSN, the batch must be regathered to remove the "Yes" in the "Invalid TIN/No TIN Solicited" column.
-
-
Select Select All TIN Solicited in the grid toolbar and then generate the export file (refer to Print/Export 1098-Ts).
-
Locking prevents updates to the records in the batch.
The "Last Modified By" value is updated.
Unlock a batch Clear the check box in the Locked column. The batch is unlocked, that is, you can add or remove students.
The "Last Modified By" value is updated.
Indicate that your institution's reporting method has changed Select the check box in the Box 3 column.
Box 3 is disabled for:
-
Batches for calendar year 2019 and later
-
Prior year batches once an electronic file is created
The Box 3 status change is saved.
The "Last Modified By" value is updated.
Use Billing Address Use Billing Address is available only for unlocked batches.
Select it to use the student's billing address on the 1098-T form and export file.
If not selected, or if no billing address exists, the student's master record address is used.
The Use Billing Address status change is saved.
The "Last Modified By" value is updated.
"Generate 1098-Ts using billing address..." is selected on the Student Review Tab > Export subtab.
View batch settings
-
Select a link in the Batch ID column.
-
Review the Batch Form below the grid.
-
Select Cancel to close the batch form.
The Batch form appears below the grid. Add a batch -
Select New in the grid toolbar.
-
Complete the Batch Form below the grid.
-
Select Save and Close on the batch form.
The Batch form is saved, and the batch is added to the grid. Delete a batch You cannot delete a locked batch.
You cannot delete a prior year batch once an electronic file is created.
If the batch form is displayed, you must close it first.
Select an unlocked batch and select Delete in the grid toolbar.
The batch is removed from the grid. Manage student records in Batch mode -
Select a row in the Batches grid.
-
Select View All Students in the grid toolbar.
-
Continue on the Student Review tab (Batch mode).
The list of students in the batch is generated and displayed on the Student Review tab. Manage individual student records on demand (Individuals mode) -
Select a row in the Batches grid.
-
Select View Individuals in the grid toolbar.
-
Continue on the Student Review tab (Individuals mode).
The Student Review tab displays an empty grid. -
Batch Form
The batch form appears below the Batches grid when you select a link in the Batch ID column or select New in the grid toolbar. The fields are editable only when New is selected.
The following options are available only the first time the 1098-T batch is gathered:
- Box 7 date range
- Citizenship Codes
- Include Exempt Students...
The specified values will apply to all students gathered in the initial batch, as well as any students added during subsequent processing attempts, unless the batch is locked.
-
Specify the Calendar Year and select the TCC Number.
The Calendar Year and TCC Number fields are filtered to show only values that do not already have a batch.
If a campus's TCC number changes, you can view students in existing locked and unlocked batches, but do not modify prior-year batches. To make changes, create a new batch using the new TCC number.
-
(Optional) Select the Setup Box 7 Logic Date Range check box and specify the Box 7 Start Date and End Date.
-
Box 7 will be checked if the term tied to the charge has a start date between January 1st and March 31st of the following tax year.
-
Box 7 will be checked if there is no term tied to the charge and the transaction date of the charge is within the date range specified (dates must be within the current tax year).
-
-
Specify the Citizenship Codesfor the new batch. At least one option must be selected in the Include column.
By default, US citizens are included ("Include" is selected). Non-citizens and eligible non-citizens are allowed to be added ("Allow A..." is selected).
-
To include exempt students, select one or more of the Include IRS Exempt Student into the Batch options:
For tax year 2021 and earlier:
-
Students with no reportable ledger card transactions for the tax year being reported.
-
Students with amounts billed equal to the scholarships or grants posted.
-
Students with amounts billed less than the scholarships or grants posted.
For tax year 2022 and later:
-
Students with no reportable ledger card transactions for the tax year being reported.
-
Students whose qualified tuition and related expenses are paid entirely with scholarships.
By default, exempt students, that is, students who have zeros in Boxes 1, 4, 5, and 6 of the 1098-T form are not gathered into the batch.
-
-
Save your changes.
Student Review Tab
The Student Review tab is displayed when you select a batch on the Selection Criteria tab and select View All Students or View Individuals. If the Student Review grid is not populated, select Reload ( ) on the toolbar.
The title of the Student Review Batch grid indicates the year, TCC number, and lock status of the selected batch, e.g., "Student Review Batch - <year>, TCC <tcc number> (Not Locked)"
For 2018 and earlier batches, if Box 3 is selected, the title also displays the text: "Reporting Method Changed"
The records and actions available in the grid depend on whether you selected View All Students (Batch Mode) or View Individuals (Individuals Mode ) on the Selection Criteria tab, and whether the batch is locked or unlocked.
Notes for Tax Year 2021 and Later
Exclude Box 4 is read-only for tax years 2021 and later because it was only applicable during an institution’s first year of Box 1 reporting.
For tax years after 2020:
-
Eligible CARES and HEERF II grant funds retained and applied to QTRE are included in Box 1, regardless of Fund Source settings or the student ledger's Include in 1098-T setting.
-
Any portion paid to the student as a stipend, refunded, or voided is excluded from Box 1.
Example: For a $1,600 CARES/HEERF II award in 2021, if $1,000 is paid as a stipend, the remaining $600 may be included in Box 1 as cash received, held by the institution, and applied towards QTRE.
-
The Box 1 amount cannot exceed QTRE plus carryover charges when CARES or HEERF II grants are retained by the institution.
-
CARES and HEERF II grant payments are not reported in Box 5.
-
Adjustments to prior-year grants are excluded from 1098-T calculations.
Batch Mode
In Batch mode, records are generated for all students in the batch and may take time to process.
-
In Selection Type, select Campus or Student Group.
-
Campus: Select one or more campuses.
-
Student Group, Select one student group from the available active public groups and groups you own or can access.
-
-
(Optional) Select Exclude Accepted Electronic Delivery to exclude records already accepted electronically and avoid printing duplicate 1098-T forms.
-
Select Apply Selection.
Matching records are marked with a check mark in the first column. All subsequent actions apply only to the selected records. The Print/Export Count and TIN Solicited Count show the number of filtered records.
-
Review the record values.
TIN Warning
For 1098-T files submitted to the IRS, institutions must make a good-faith effort to obtain a student's TIN. When TIN Solicited is selected, the institution certifies that it has requested the student's TIN.
For tax year 2022 and later, a warning is displayed when you lock a batch or generate an IRS export if the batch contains students who do not have an SSN and whose TIN Solicited check box is not selected.
When the warning is displayed:
-
Select Continue Locking to lock the batch and update the TIN Solicited check box before generating the export file.
— OR —
-
Select Cancel to prevent the batch from being created and proceed as follows:
-
Select View All Students in the grid toolbar to return to the Student Review tab.
-
Sort the records in the Student Review Batch grid based on the "Invalid TIN/No TIN Solicited" column or export the records to Excel and then sort the records.
The "Invalid TIN/No TIN Solicited" column:
-
Is blank for all students that have an SSN on file AND have the "Solicited TIN" flag selected
-
Has a value of "Yes" for all students that do not have an SSN on file AND do not have the "Solicited TIN" flag selected
For records with a "Yes" in the "Invalid TIN/No TIN Solicited" column, take the needed steps to solicit a TIN or navigate to a student's record and add an SSN.
If you add an SSN, the batch must be regathered to remove the "Yes" in the "Invalid TIN/No TIN Solicited" column.
-
-
Select Select All TIN Solicited in the grid toolbar and then generate the export file (refer to Print/Export 1098-Ts).
-
Positive amounts in Prior Year Adjustments (Box 4) are displayed for informational purposes only and are not printed on the 1098-T form. These amounts may result from voided transactions marked as Previous Year and are shown in the grid to support verification or adjustment as needed.
By default, the rows are sorted in ascending order by Student.
-
-
The actions you can take depend on whether the batch is locked or unlocked.
Locked Batch - Batch Mode Task Action to Take Select records Choose Select All Across Pages to select all records. To select specific records, select Clear All Across Pages and then select individual rows. Print/Export When you select Print/Export, the Print, Publish to Portal, Export, and Reports subtabs are displayed below the grid. Continue with Print/Export 1098-Ts. View Details Select a student record and select View Details in the grid toolbar. Continue with View/Modify 1098-T Details. Unlocked Batch - Batch Mode Task Action to Take Select records Choose Select All Across Pages to select records across all pages. To select specific records, select Clear All Across Pages and then select individual rows. Change TIN Solicited Choose Select All TIN Solicited to select all TIN solicited records. To select specific records, select Clear All TIN Solicited and then select individual rows. Add a student to the batch -
Select Add Student in the grid toolbar. The Select Student dialog displays a grid listing all students in the database.
-
In the Select Student dialog, search for a student by name or select a student in the grid.
Select Show Filter Row to sort or filter the grid by Name, SSN (if permitted), Student Number, Program, Campus, or Phone.
Select Select to add the student to the batch.
-
If the student is already in the batch, a validation message is displayed and the student is not added.
-
If the student was previously deleted from the batch, the deletion flag is removed and the student is restored.
-
If the student is not in the batch, the system validates that:
-
The student's campus matches the batch's TCC campus.
-
The student's citizenship is included in the batch's "Include 1098" or "Allow Add" settings.
If validation fails, the student is not added and a message is displayed.
If validation succeeds, the student is added, "Manually Added" is set to true, and "Manually Added Date" is updated.
-
Remove a student from the batch -
Select a student record in the grid.
-
Select Remove Student in the grid toolbar.
-
Select Remove to confirm.
Print 1098-T forms / Create export files / Generate Reports When you select Print/Export, the Print, Publish to Portal, Export, and Reports subtabs are displayed below the grid. Continue with Print/Export 1098-Ts. Modify Details Select a student record and select Modify Details in the grid toolbar. Continue with View/Modify 1098-T Details.
-
-
To manage a group based on the student records you selected in the grid, select Save Student Group. The Save to Student Group pop-up is displayed.
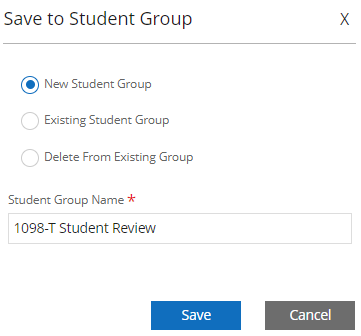
In the Save to Student Group dialog, you can:
-
Create a new student group by selecting New Student Group and entering a name. New groups are created as Manual and Private.
-
Add students to an existing group by selecting Existing Student Group and choosing a group. Only the group owner can add students.
-
Remove students from an existing group by selecting Delete From Student Group and choosing a group. Only the group owner can remove students.
Select Save to proceed.
-
Individuals Mode
After a 1098-T batch is created for a tax year, you can generate forms for individual students by selecting View Individuals on the Selection Criteria tab. In Individuals mode, the Student Review tab displays an empty grid.
-
The grid columns are the same as in Batch Mode.
-
The only action available is to add a student to the grid. The validation depends on whether the batch is locked or unlocked.
Locked Batch - Individuals Mode Task Action to Take Add a student to the grid -
Select Add Student in the grid toolbar. The following message is displayed:
The student {0} does not exist in this Batch. This batch is currently locked. In order to add a student, the batch must be unlocked.
-
If applicable, unlock the batch and proceed with the unlocked batch.
You can add only students already included in the batch and remove only students added to the form. The Add and Remove buttons do not change the number of students stored in the batch.
Unlocked Batch - Individuals Mode Task Action to Take Add a student to the grid -
Select Add Student in the grid toolbar. The Select Student dialog displays a grid listing all students in the database.
-
In the Select Student dialog, search for a student by name or select a student in the grid.
Select Show Filter Row to sort or filter the grid by Name, SSN (if permitted), Student Number, Program, Campus, or Phone.
Select Select to add the student to the batch.
-
If the student is already in the batch, a validation message is displayed and the student is not added.
-
If the student was previously deleted from the batch, the deletion flag is removed and the student is restored.
-
If the student is not in the batch, the system validates that:
-
The student's campus matches the batch's TCC campus.
-
The student's citizenship is included in the batch's "Include 1098" or "Allow Add" settings.
If validation fails, the student is not added and a message is displayed.
If validation succeeds, the student is added, "Manually Added" is set to true, and "Manually Added Date" is updated.
-
-
-
Once students have been added to the Student Review grid in Individuals mode, all grid toolbar buttons will be enabled. You can:
-
Select All Across Pages or Clear All Across Page (toggle)
-
Select All TIN Solicited or Clear All TIN Solicited (toggle)
-
Add Student
-
Remove Student
In Individuals mode, the Remove Student option removes a student from the Student Review Batch grid. It does not remove the student from the batch.
-
Print/Export
When you select Print/Export, the Print, Publish to Portal, Export, and Reports subtabs are displayed below the grid. Continue with Print/Export 1098-Ts.
-
Modify Details
Select a student record in the grid. Select Modify Details in the grid toolbar. Continue with View/Modify 1098-T Details.
-
History Tab
By default, the History tab displays only batch jobs for the latest tax year. To view the filter setting, select the Show|Hide Filters icon ( ) on the right side of the grid toolbar or select the filter icon in the Calendar Year column header.
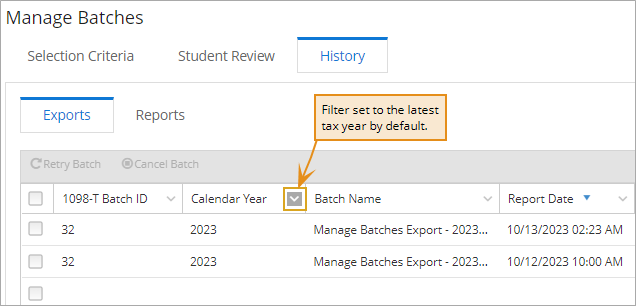
You can filter the grid by other columns or clear the filter to view records from all tax years. If no batches are displayed, use the Clear filter option. Filter settings are retained per user for the Exports and Reports grids.
- Select Exports to view export job results.
-
Select Reports to view print job results.
Exports
The Exports tab lists all 1098-T export jobs. If a batch is exported multiple times, each export appears as a separate job identified by its date, time, and file name.
-
Review the record values.
By default, jobs are sorted by Start Date in descending order. Use column sorting and filtering to customize the grid.
-
If the job status is:
-
Succeeded, the file is created in the Export File Folder. Access the Export tab.
-
Completed , it has a Details link indicating failure. Select Retry Batch to resubmit the job (for example, after a network or SQL connectivity issue).
-
-
To remove a failed export job, select Cancel Batch. Only failed export jobs can be canceled.
Reports
The Reports tab lists all 1098-T batch print jobs. If a batch is printed multiple times, each print job is listed separately and can be identified by its date, time, and file name.
-
Review the record values.
By default, the records are sorted in descending order by Started date. You can use column sort and filtering options to customize the grid.
-
Select View Report to view or download the PDF file. You can also export the report data to Excel.
If the job status is:
-
Succeeded, the Results column is empty, and the batch print file is created.
-
Completed with a Details link indicating failure reasons.
The batch jobs remain available in the History grid for two weeks. If data in a report is revised, a new report needs to be created.
-
-
To remove a batch, select Cancel Batch. You can remove only jobs that have a status of Completed.
| This feature applies to U.S. compliance only. |
