Financial Aid Overview
The Configuration > Student Experience > Financial Aid Overview page is provided to configure the content displayed on the Financial Aid Overview page in the Student Portal. All other Portal configurations are currently done using the Portal Admin Console and the Portal Configuration Tool. Refer to the Portal Administrator Help at for more details.
You can apply the configuration settings from the Financial Aid Overview page to different campuses. You can customize the content based on your institution's needs.
Upon selecting a campus with an existing configuration, the previously saved configuration details are displayed and you can update the existing configuration. Any changes in the saved configuration details are reflected in the Portal.
The new default values are displayed to the student on the Financial Aid Overview page when a new Portal instance is installed.
Migrating an Existing Portal
If your institution's existing Portal has been migrated, the existing default values will override the new default values where an exact mapping of fields exists. Any configuration areas that were not migrated will retain the existing default values. The migration is a one-time event (that is, it cannot be repeated. To import the configuration data from an existing Portal instance, log in to the Portal Admin Console, select the Import Config link in the Administration section on the Admin Console Home page, and select Import Configuration for all campuses. If you do not want to upgrade the configuration for all campuses, select Import for a specific campus.
You can manually update and save the configuration after migrating an existing Portal configuration. Any manual updates will override the default values on the new or migrated Portal.
Prerequisites
Authorizations:
-
Student Experience - Configuration - Financial Aid Overview - Edit
If Student Experience 23.1.0 is deployed with Regulatory 23.2.0, the View permission is inherited by just giving Edit permissions in the Web Security Console; in other words, the user can view/save the Financial Aid Overview configuration page when only Edit permission (no View permission) is given to the user. For all other versions, you must have both Edit and View authorization.
-
Student Experience - Configuration - Financial Aid Overview - View
-
All Query Operations
-
Common Campus Query and/or Modern Campus - Query Operations
You can create custom tasks for groups/roles and grant them access to the required Common Campus Query operation. The custom tasks will include a subset of the permissions associated with the All Query Operations task. Refer to Configure OData Query Authorization. Contact Ellucian for assistance if needed.
To edit an item associated with multiple campuses, you must have access to all assigned campuses. If you have access to only some of the campuses, you can view the item but cannot edit it. When adding an item, you can select only campuses you can access.
Access
Configuration > Student Experience > Financial Aid Overview
Configure Items
Financial Aid Overview Tab
-
In the Campuses field, select the campus to which you want to apply the configuration settings.
By default, the campus specified in your Session Defaults is selected. The Campus drop-down lists all the campuses you have permission to access.
-
Expand each of the following sections and specify applicable settings for your institution. Select Expand All/Collapse All to expand or collapse all sections at once.
The text fields have a Rich Text Editor with the following options:
- Bold
- Italic
- Underline
- Undo and Redo
- Insert ordered list
- Insert unordered list
- Indent and outdent paragraph
- Insert hyperlink and Remove hyperlink
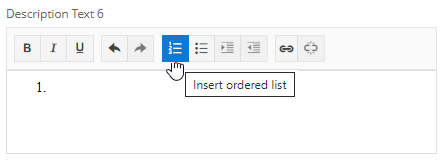
The editor provides tooltips when hovering over the toolbar options. The options are context-sensitive, that is, you need to place the cursor in the text field and then select an applicable option.
 Description
-
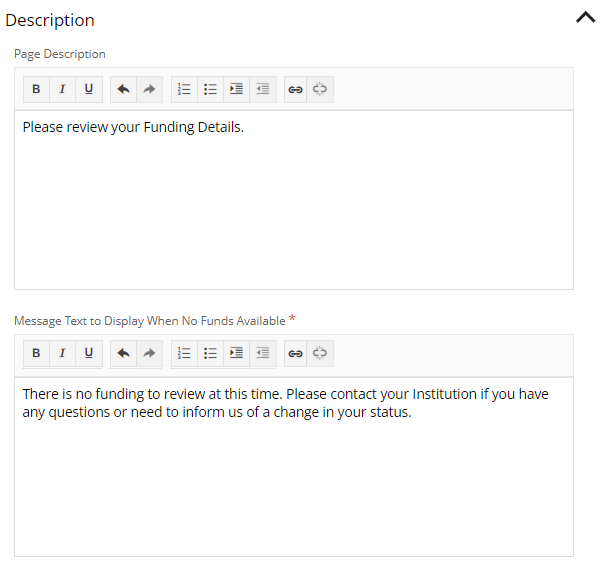
In the Page Description field, specify the text to be displayed at the top of the Financial Aid Overview page in the Portal.
-
In the Message Text to Display When No Funds Available field, specify the text to be displayed below the Academic Year field if there is no Financial Aid Offer available to the student in a selected academic year.
Location on the Financial Aid Overview page: 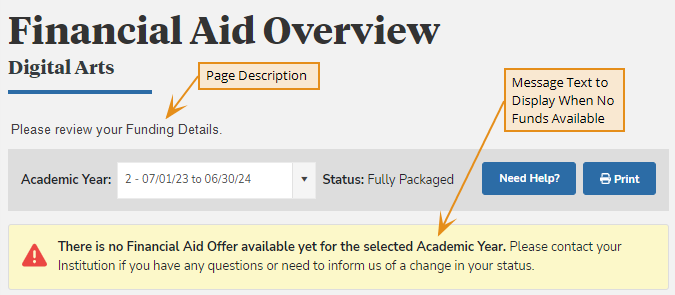 Help Dialog
-
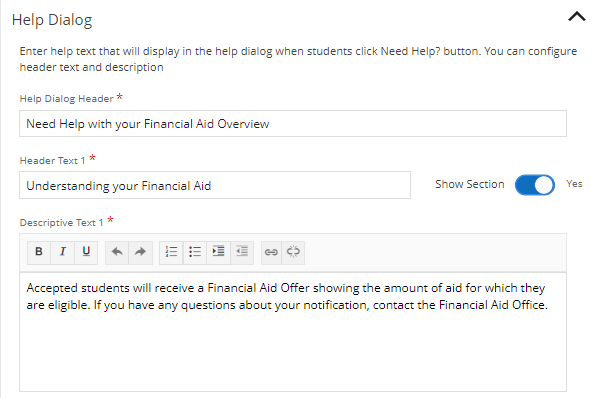
In the Header Text 1 field, specify the text displayed as the first heading when a student selects Need Help on the Financial Aid Overview page.
-
In the Descriptive Text 1 field, specify the text to be displayed under the first heading.
-
By default, the Show Section option is set to Yes. Select the No if you do not want to show the section.
-
Select Add Section to add another section. Specify Header Text 2 and Descriptive Text 2. Repeat this step until you have completed the Help Dialog for your institution. You can add up to 4 help sections.
Location on the Financial Aid Overview page: 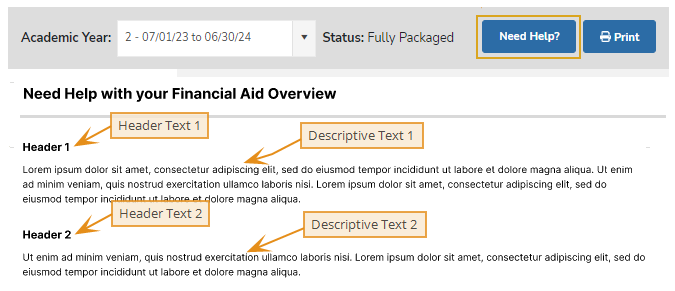 Cost of Attendance
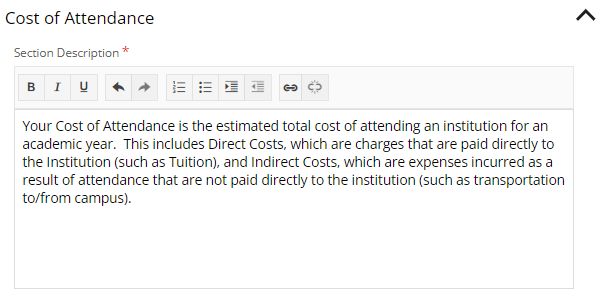
In the Section Description field, specify the text to be displayed under the Cost of Attendance (Estimated) heading on the Financial Aid Overview page.
The items listed in the Estimated Direct Costs and Estimated Indirect Costs columns on the Financial Aid Overview page are retrieved from the student's profile under Financial Aid > Awarding > Academic Years tab in the Budget Information section of Anthology Student.
The Portal displays all the values specified under Budget Definition in the Budget Information section. Values under Institutional and Other Charges are displayed only if the charges are marked as Institutional.
Location on the Financial Aid Overview page: 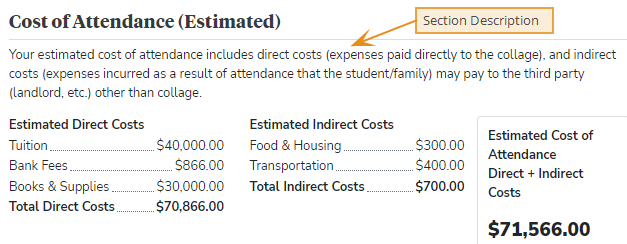
For customers using financial aid in the Anthology Student legacy system, Automated Awarding Auto Packaging will not update description names for non-institutional or institutional values of the cost of Attendance (COA) on the currently released Portal if you have not enabled Settings > System > Advanced Features > Allow Extended Budget. We recommended enabling Allow Extended Budget which will require you to configure COA budgets within the Anthology Student web app only. The COA configuration in the web app will be used by the legacy system to calculate the budget from the new configurations.
You can specify the Automated Awarding Effective Date in the Anthology Student web app under Configuration > Financial Aid > Automated Awarding Campus Settings. The Automated Awarding Effective Date will be used against any academic year with the same or future start date to begin using the COA configured in the web app in the legacy budget and awards. All academic year sequences before the Automated Awarding Effective Date will not be changed because those sequences are in the past.
Financial Aid Details
Opening Section
-
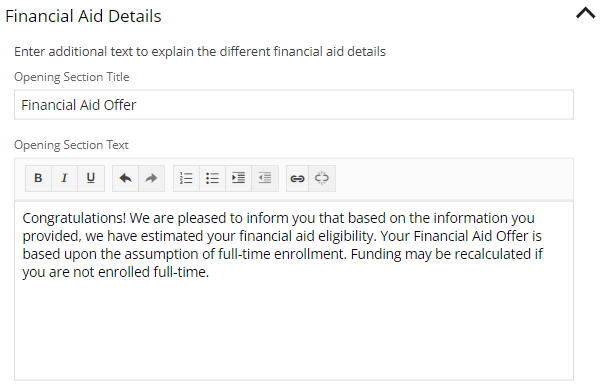
In the Opening Section Title field, specify the heading to be displayed below the Cost of Attendance section.
-
In the Opening Section Text field, specify the text to be displayed under the Opening Section Title.
Location on the Financial Aid Overview page: 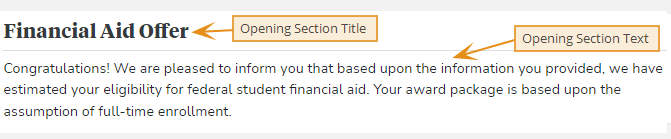 Grants and Scholarships
-
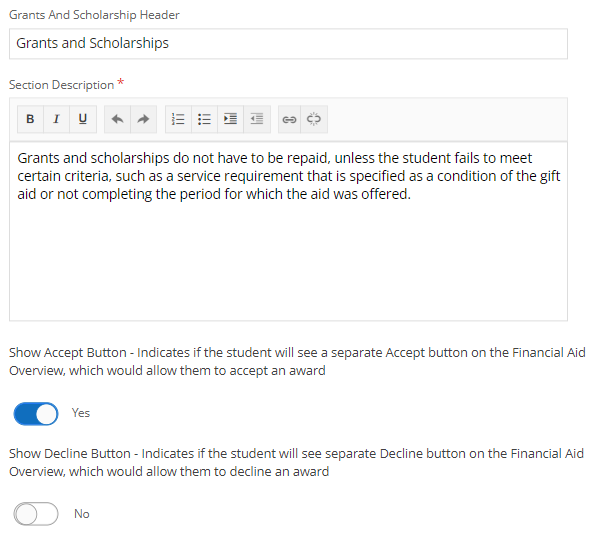
In the Header field, specify the title for this section or accept the default.
-
In the Section Description field, specify the text to be displayed under the header.
-
By default, Accept is displayed. Select the No if you do not want to show Accept.
-
By default, Decline is not displayed. Select the Yes if you want to show Decline.
Location on the Financial Aid Overview page: 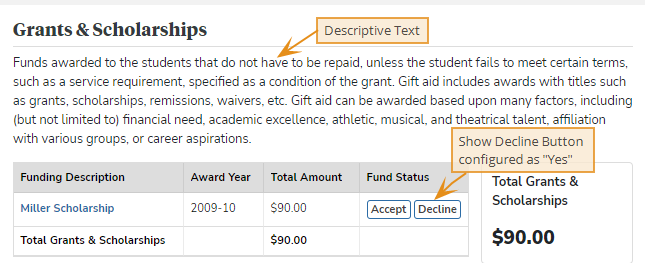 Loans
Loans
-
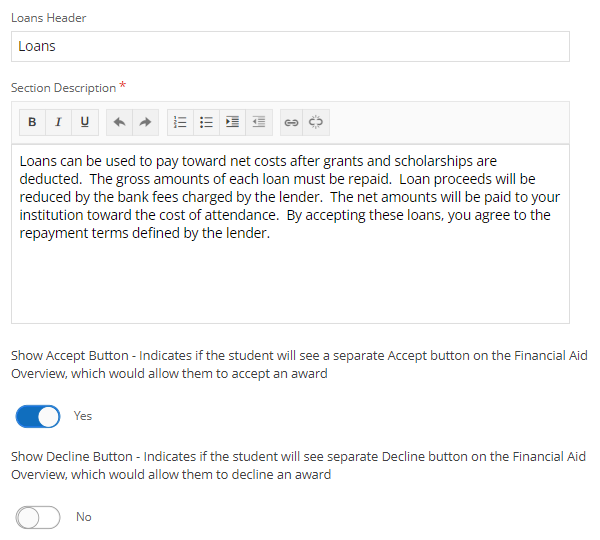
In the Header field, specify the title for this section or accept the default.
-
In the Section Description field, specify the text to be displayed under the header.
-
By default, Accept is displayed. Select the No if you do not want to show Accept.
-
By default, Decline is not displayed. Select the Yes if you want to show Decline.
Location on the Financial Aid Overview page: 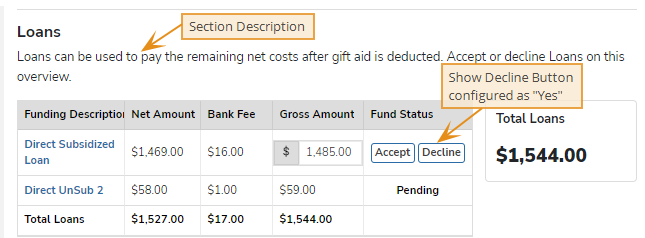 Parent PLUS Loan
-
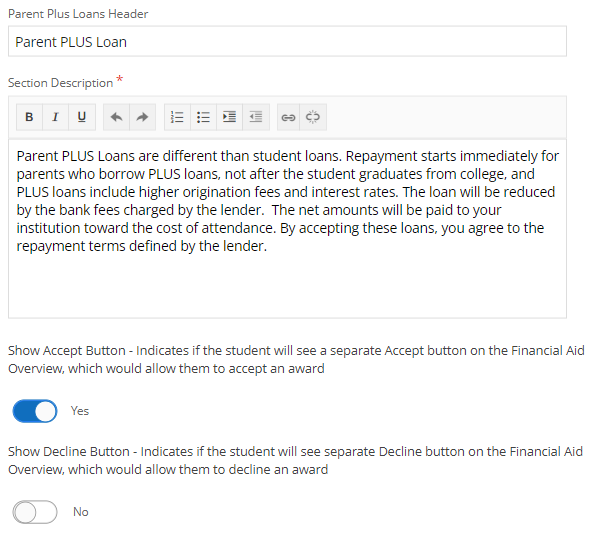
In the Header field, specify the title for this section or accept the default.
-
In the Section Description field, specify the text to be displayed under the header.
-
By default, Accept is displayed. Select the No if you do not want to show Accept.
-
By default, Decline is not displayed. Select the Yes if you want to show Decline.
Location on the Financial Aid Overview page: 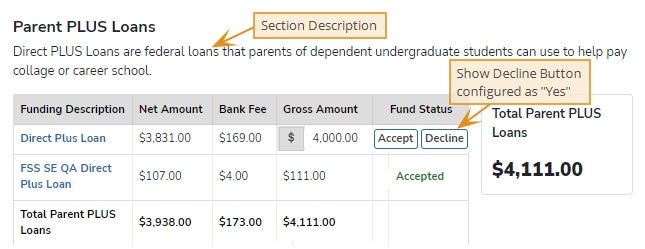 Work-Study Section
-
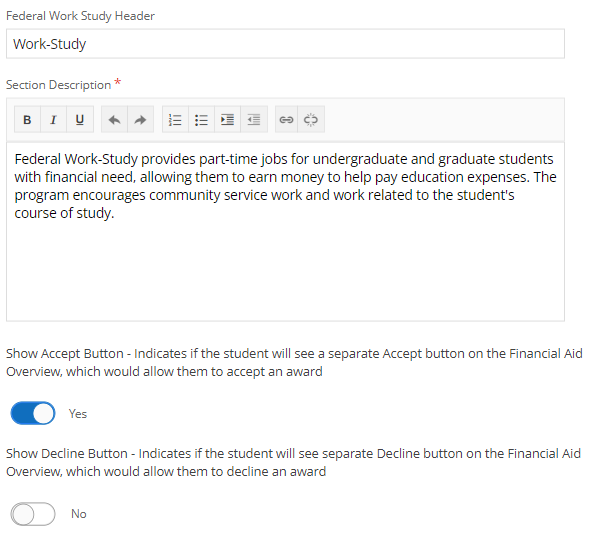
In the Header field, specify the title for this section or accept the default.
-
In the Section Description field, specify the text to be displayed under the header.
-
By default, Accept is displayed. Select the No if you do not want to show Accept.
-
By default, Decline is not displayed. Select the Yes if you want to show Decline.
Location on the Financial Aid Overview page: 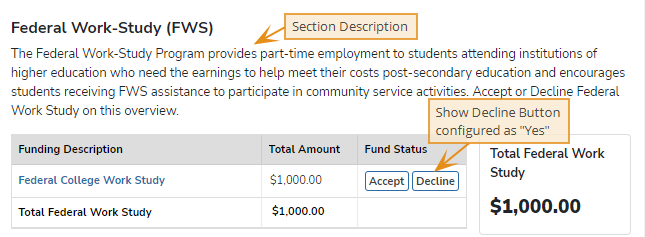 Other Funding
-
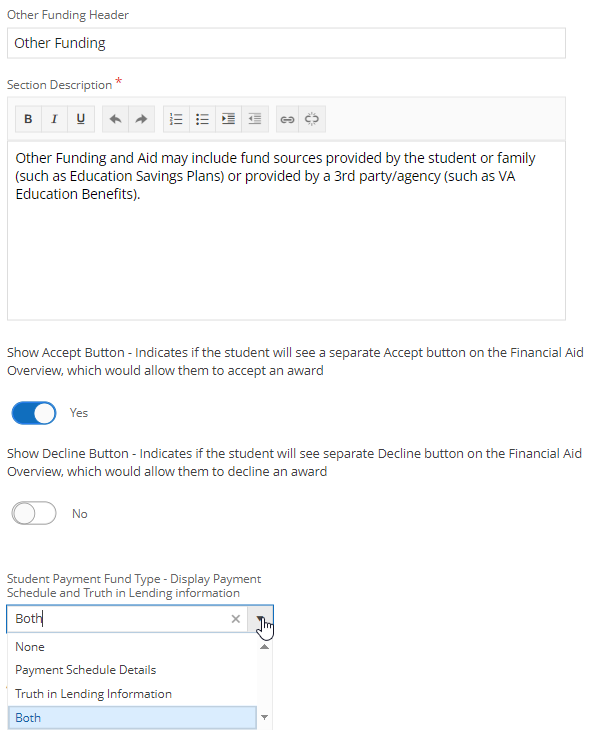
In the Header field, specify the title for this section or accept the default.
-
In the Section Description field, specify the text to be displayed under the header.
-
By default, Accept is displayed. Select the No if you do not want to show Accept.
-
By default, Decline is not displayed. Select the Yes if you want to show Decline.
-
For Student Payment/Cash funds, select a value in the Student Payment Fund Type - Display Payment Schedule and Truth in Lending information field. This option determines whether the Payment Schedule detail and the Student cash payment plan are displayed in the Other Funding grid in the Portal.
When you configure Student Payment Fund Type - Display Payment Schedule and Truth in Lending information as:
-
None, the grid does not display the expand option for Payment schedule details and the Student cash payment plan
-
Payment Schedule Details, the grid displays only the Payment schedule details
-
Truth in Lending Information, the grid displays only the Student cash payment plan
-
Both, the grid displays the Payment schedule detail and the Student cash payment plan
The Payment Schedule and Student Cash Payment Plan (Truth in Lending) details are not shown on the Financial Aid Offer page when Student Payment/Cash type funding is Canceled or Declined (regardless of the configuration settings for Canceled/Declined funding).
-
Location on the Financial Aid Overview page: 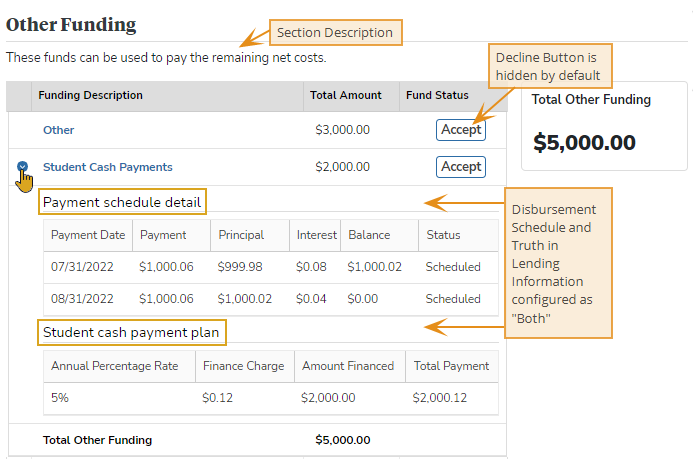 Accept All & Decline All Buttons
-
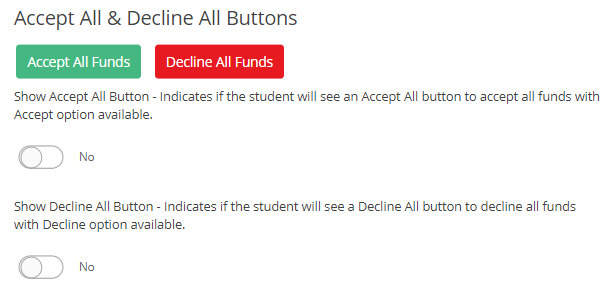
By default, Accept All Funds is not displayed on the Financial Aid Offer page. Select the Yes to show Accept All Funds.
-
By default, Decline All Funds is not displayed on the Financial Aid Offer page. Select the Yes to show Decline All Funds.
Location on the Financial Aid Overview page: 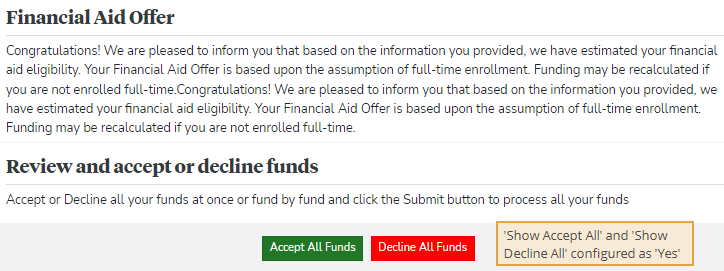 Closing Section
-
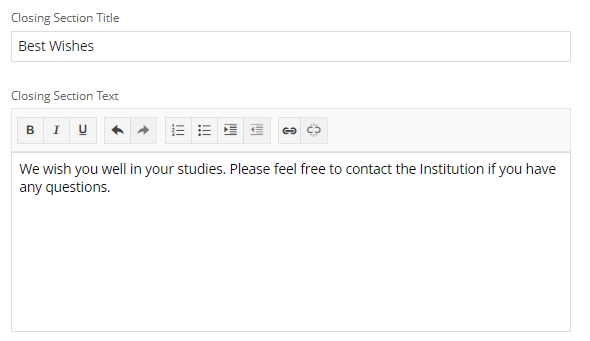
In the Closing Section Title field, specify the heading to be displayed above Submit Funds at the bottom of the Financial Aid Overview page.
-
In the Closing Section Text field, specify the text to be displayed under the closing section title.
Location on the Financial Aid Overview page: 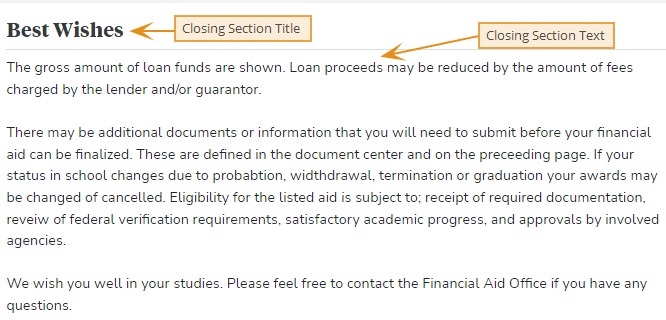 Internal Administrative Notifications
You can configure the Portal to create notifications and tasks for financial aid advisors or administrators when a student accepts and declines a fund source on the Financial Aid Overview page. By design, the notifications are sent to 1 staff member who must be part of a configured staff group. Not all members of the staff group will get the notifications.
-
If the FA Advisor assigned to the student's academic year is part of the configured staff group, the FA Advisor will receive a notification.
-
If the FA Advisor is not configured, the system will notify the Campus Level Default FA Advisor (configurable under Configuration > Contact Manager > Default Campus Advisors).
For notifications and tasks to be created, you must:
-
Ensure the Task Templates for the respective campuses are available (refer to Task Templates)
-
Select and save the Contact Manager Task Template
-
Select and save the Notification Target as Staff Member or Staff Group
-
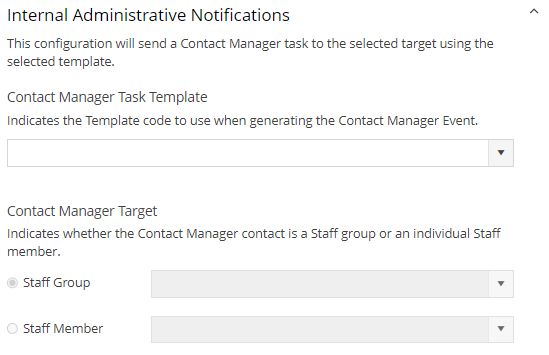
In the Task Template field, select Template code to use when generating the Contact Manager Event.
-
To send notifications to a staff group, select the Staff Group option and select the staff group.
-
To send notifications to a staff member, select the Staff Member option and select the staff member.
When a student accepts or declines a fund, the notification to the selected targets displays the following details:
-
Student Number: Student_No
-
Fund Status: Accepted or Declined
-
Fund Source: Funding_Description
When a student accepts a loan after reducing the loan amount, the notification displays the following details in addition to the Student Number, Fund Status, and Fund Source:
-
New Amount: $ new_amount
-
Select Save to save the configuration changes.
-
To reset the configuration to its default values, select Reset to Default Values and confirm by selecting Reset.
-
To preview your configuration of the Financial Aid Overview page to determine how it will be displayed in the Student Portal, select Preview FA Overview at the top of the page. You can select Web Preview and Mobile Preview. Select the close icon (
 ) at the top right or press the Esc key to close the preview window.
You can scroll through the preview window but cannot use the Accept/Decline buttons, expand collapsed sections, edit amounts, or use any other functionality of the Financial Aid Overview page.
-
Select Copy FA Overview Settings to copy the configuration to another campus.
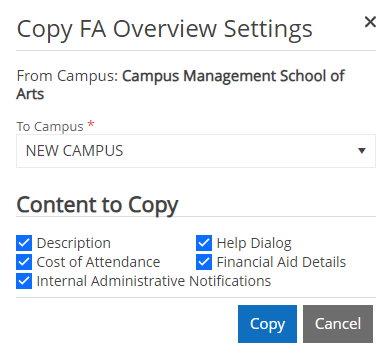
-
In the Campus drop-down list, select the campus to which you want to copy the Financial Aid Overview configuration. Only active campuses will be available for selection.
-
Under Content to Copy, select the check boxes for the page sections you want to copy. By default, all sections are selected.
-
Select Copy.
-
You can configure E-Mail and SMS-Text notifications related to a student's interactions with the Financial Aid Overview page in the Student Portal. Refer to System Templates for Financial Aid Overview Notifications.
Renewal Requirements Tab
By default, the Renewal Requirements tab includes a set of terms and definitions that apply to gift aid, loans, work-study, and other funding. You can add, edit, and delete the renewal requirements items according to your institution's needs.
-
In the Campuses field, select the campus to which you want to apply the configuration settings.
By default, the campus specified in your Session Defaults is selected. The Campus drop-down lists all the campuses you have permission to access.
-
Review the default items and edit them as appropriate. Each item consists of a header field and a description field.
The text fields have a Rich Text Editor with the following options:
- Bold
- Italic
- Underline
- Undo and Redo
- Insert ordered list
- Insert unordered list
- Indent and outdent paragraph
- Insert hyperlink and Remove hyperlink
The editor provides tooltips when hovering over the toolbar options. The options are context-sensitive, that is, you need to place the cursor in the text field and then select an applicable option.
-
Under Show Section for each item, select Yes or No to indicate whether the item should be displayed on the Financial Aid Overview page in the Student Portal. If you select No, the item will be grayed out on the configuration page and will not be visible in the Student Portal.
-
To add an item, select Add Section at the bottom of the page. This will append a blank header and description field to the page.
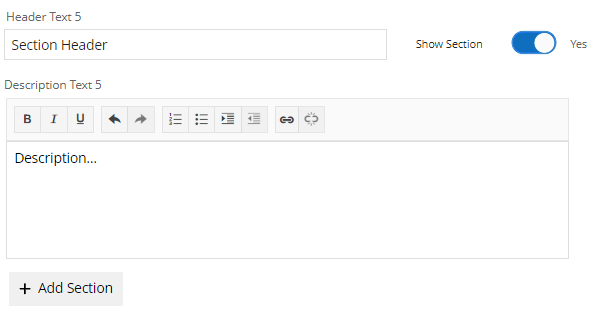
-
Specify the renewal item name or category term in the header field.
-
Specify the definition in the description field and format the content as needed.
-
Under Show Section, select Yes or No to indicate whether the item should be displayed on the Financial Aid Overview page in the Student Portal. If you select No, the item will be grayed out on the configuration page and will not be visible in the Student Portal.
-
-
Select Save at the top of the page to save your changes on the Renewal Requirements tab.
-
To reset the configuration to its default values, select Reset to Default Values and confirm by selecting Reset.
-
Select Copy Renewal Requirements Settings to copy the configuration to another campus.
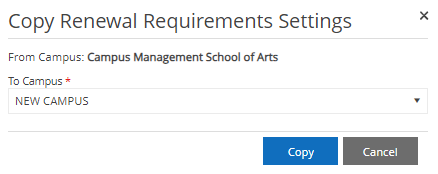
-
In the Campus drop-down list, select the campus to which you want to copy the Renewal Requirements configuration. Only active campuses will be available for selection.
-
Select Copy.
-
Glossary Tab
By default, the Glossary tab includes a set of terms and definitions adapted from the National Association of Student Financial Aid Administrators (NASFAA). You can add, edit, and delete the glossary items according to your institution's needs.
-
In the Campuses field, select the campus to which you want to apply the configuration settings.
By default, the campus specified in your Session Defaults is selected. The Campus drop-down lists all the campuses you have permission to access.
-
Review the default glossary items and edit them as appropriate. Each glossary item consists of a header field and a description field.
The text fields have a Rich Text Editor with the following options:
- Bold
- Italic
- Underline
- Undo and Redo
- Insert ordered list
- Insert unordered list
- Indent and outdent paragraph
- Insert hyperlink and Remove hyperlink
The editor provides tooltips when hovering over the toolbar options. The options are context-sensitive, that is, you need to place the cursor in the text field and then select an applicable option.
-
Under Show Section for each glossary item, select Yes or No to indicate whether the item should be displayed on the Financial Aid Overview page in the Student Portal. If you select No, the item will be grayed out on the configuration page and will not be visible in the Student Portal.
-
To add a glossary item, select Add Section at the bottom of the page. This will append a blank header and description field to the page.
-
Specify the glossary term in the header field.
-
Specify the term definition in the description field and format the content as needed.
-
Under Show Section, select Yes or No to indicate whether the glossary item should be displayed on the Financial Aid Overview page in the Student Portal. If you select No, the item will be grayed out on the configuration page and will not be visible in the Student Portal.
-
-
Select Save at the top of the page to save your changes on the Glossary tab.
-
To reset the configuration to its default values, select Reset to Default Values and confirm by selecting Reset.
-
Select Copy Glossary Settings on the toolbar to copy the configuration to another campus.
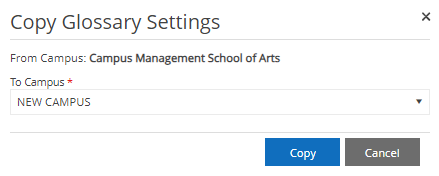
-
In the Campus drop-down list, select the campus to which you want to copy the Glossary configuration. Only active campuses will be available for selection.
-
Select Copy.
-
Housing Tab
You can use the Housing tab to configure the housing status dialog in the Student Portal.
-
In the Campuses field, select the campus to which you want to apply the configuration settings.
By default, the campus specified in your Session Defaults is selected. The Campus drop-down lists all the campuses you have permission to access. :
-
Under Enable Housing Dialog on Financial Aid Overview, select Yes or No to indicate whether the item should be displayed on the Financial Aid Overview page in the Student Portal.
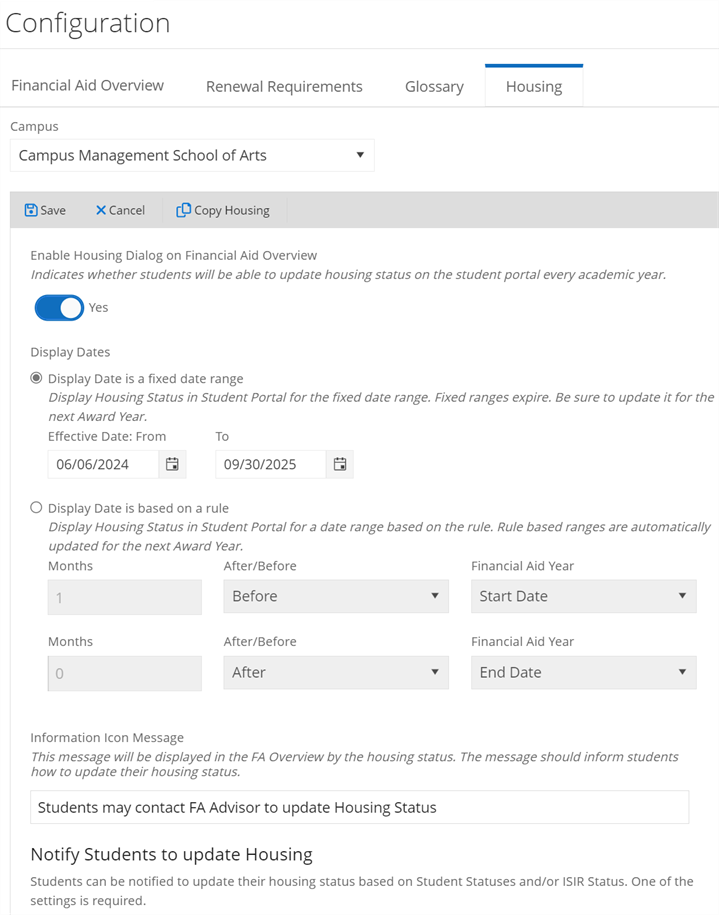
By default, the housing configuration items will be disabled and not visible in the Student Portal.
-
If you enable the housing dialog, you can specify the date range for its display using one of the following options:
-
Display Date is a fixed date range (default) — Specify the Effective Date: From and To values. The From date must be after January 1 of the current year. The number of months between the From and To dates cannot exceed 24 months.
The system updates the housing status for all award years affected by the selected date range. For example, if the date range is April 1, 2024 through September 30, 2025, housing status is updated for award years 2023–24, 2024–25, and 2025–26, provided those award years fall within the selected date range, even if a housing status was not previously defined for an earlier affected award year.
-
Display Date is based on a rule — Specify months after and before the financial aid year start date and end date. The number of months cannot exceed 9 months.
Once you have entered a valid date range, an informational message displays the configuration ("Housing Status pop-up will be displayed From <Start Date> To <End Date>").
When the date range is based on a rule, the configuration is carried forward to future award years by default.
-
-
When a student has already updated the housing status via the housing status pop-up or the housing status was retrieved from a previously selected housing status value, the Portal displays an information icon next to the housing status value with the tooltip: " Students may contact FA Advisor to update Housing Status". You can edit the default text in the Information Icon Message field.

-
At the beginning of a new award year, you can Notify Students to Update Housing on the Financial Aid Overview page.
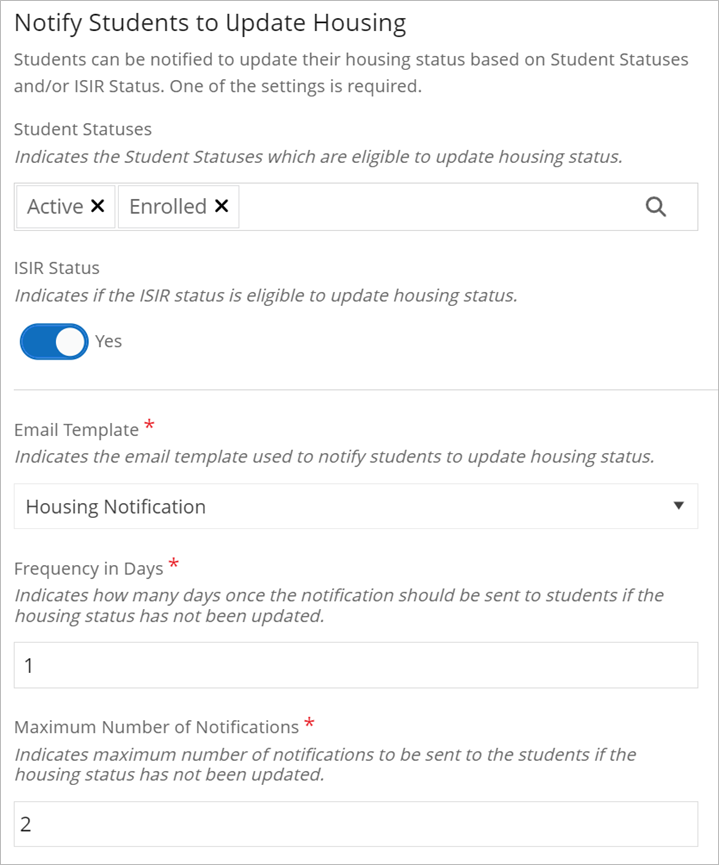
Specify the following options to configure the housing notifications:
-
Select the Student Statuses that are eligible to update housing status. The search tool lists all the statuses configured by your institution (refer to Student Statuses & Colors). You can select multiple statuses.
-
Select whether an ISIR is required to update the housing status. The default setting is No.
Students can be notified to update their housing status based on Student Statuses and/or ISIR Status. One of the settings is required.
-
Select an existing Email Template to notify students to update their housing status or create a new template.
To create a new template, navigate to Configuration > Contact Manager > Task Templates.
Select New and create a template using the following details:
-
Description: Housing Notification
-
Code: HN
-
Campuses: All Campuses
-
Active: Yes
-
Category: Alert Emails
-
Event Type: E-Mail Student
-
Email Subject: Housing Notification (This can be changed).
-
Email Message: Review the sample message below. The URL for the Financial Aid Overview page should be available. Verify any merge fields used in the template by referencing Available Merge Field Codes for E-mail Task Templates.
Dear <studentfirstname> <studentlastname>,
Your housing status for the {FinancialAidYearDescription} is required to determine your eligibility for Federal Student Aid. Your Financial Aid Offer cannot be finalized until you provide this information.
Please visit the Student Portal at {PortalLink} and select the option that best describes your residence for the upcoming Financial Aid Year {FinancialAidYearDateRange}, while enrolled at the school.
Sincerely,
<campusname>
The Financial Award Year and Financial Aid Date Year range will be handled internally without merging fields.
The character limit for the email message has been increased from 1600 to 2000 characters.
-
-
Specify the Frequency in Days after which the notification should be resent to students if the housing status has not been updated.
The system validates the values you enter for Frequency in Days and Maximum Number of Notifications against the effective Date Range you selected in Step 3.
-
Specify the Maximum Number of Notifications to be sent to the students if the housing status has not been updated.
-
-
Select Save at the top of the page to save your changes on the Housing tab.
-
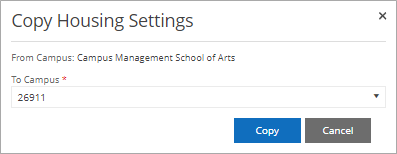
Select Copy Housing on the toolbar to copy the configuration to another campus.
-
In the Campus drop-down list, select the campus to which you want to copy the Housing Settings. Only active campuses will be available for selection.
-
Select Copy.
-
Document Tab
You can use the Document tab to configure your institution's logo and color bars to be printed on the Summary and Detailed reports generated from the Financial Aid Overview page.
-
In the Campuses field, select the campus to which you want to apply the configuration settings.
By default, the campus specified in your Session Defaults is selected. The Campus drop-down lists all the campuses you have permission to access. :
-
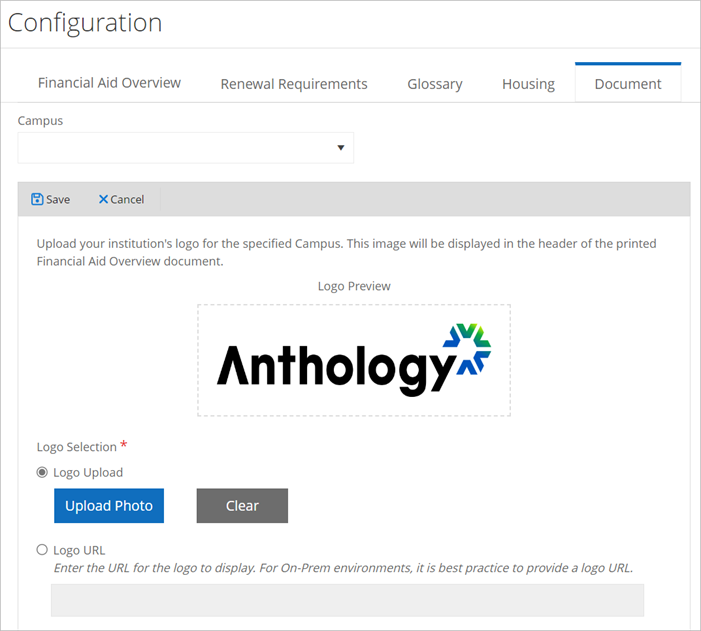
Under Logo Selection, you can select whether to upload a logo file or use a URL to point to the logo file.
The maximum size of the logo should be 256 KB. The recommended dimensions are 300 x 80 pixels. Supported file formats are BMP, GIF, JPG, JPEG, and PNG.
-
If you choose the Logo Upload option, select Upload Logo and navigate to the image file in your local file system. Select Clear to change your image selection,
-
If you choose the Logo URL option, specify the URL for the logo.
Best Practice: For on-premise environments, it is best practice to provide the logo URL.
After uploading the logo or entering the URL, the logo appears in the Logo Preview space.
-
-
Under Bar Color, you can select the color of the horizontal bars that summarize the sections in the Summary and Detailed reports. The default color is blue.
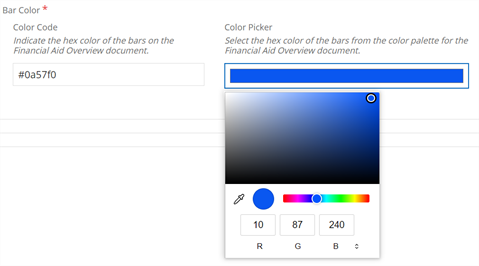
When you specify a hex value in the Color Code field, the Color Picker displays the selected color.
When you select a color in the Color Picker, the Color Code field is populated automatically.
-
Select Save in the toolbar at the top of the page to save your changes on the Document tab.
Notifications Tab
You can use the Notifications tab to configure Contact Manager notifications for staff members and students when specific events are triggered from the Financial Aid Overview page.
-
In the Campuses field, select the campus to which you want to apply the configuration settings.
By default, the campus specified in your Session Defaults is selected. The Campus drop-down lists all the campuses you have permission to access.
-
Specify the configuration details for staff notifications and student notifications.
For notifications and tasks to be created, you must:
-
Ensure the Task Templates for the respective campuses are available (refer to Task Templates)
-
Select and save the Contact Manager Task Template
-
Select and save the Notification Target as Staff Member, Staff Group, or Student
Staff Notifications
You can configure the Portal to create notifications and tasks for financial aid advisors or administrators when a student accepts and declines a fund source on the Financial Aid Overview page. Tasks assigned to a staff member will appear in the Tasks tile of Contact Manager in Anthology Student (refer to Tasks).
By design, the notifications are sent to 1 staff member who must be part of a configured staff group. Not all members of the staff group will get the notifications.
-
If the FA Advisor assigned to the student's academic year is part of the configured staff group, the FA Advisor will receive a notification.
-
If the FA Advisor is not configured, the system will notify the Campus Level Default FA Advisor (configurable under Configuration > Contact Manager > Default Campus Advisors).
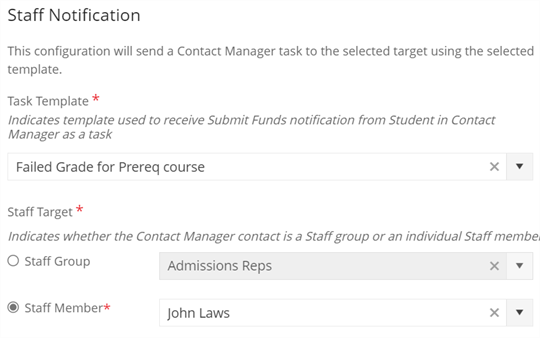
-
In the Task Template field, select Template code to use when generating the Contact Manager Event.
-
To send notifications to a staff group, select the Staff Group option and select the staff group.
-
To send notifications to a staff member, select the Staff Member option and select the staff member.
When a student accepts or declines a fund, the notification to the selected targets displays the following details:
-
Student Number: Student_No
-
Fund Status: Accepted or Declined
-
Fund Source: Funding_Description
When a student accepts a loan after reducing the loan amount, the notification displays the following details in addition to the Student Number, Fund Status, and Fund Source:
-
New Amount: $ new_amount
Student Notifications
You can configure the Portal to create notifications for students. Anthology Student provides system templates for student notifications (refer to System Templates for Financial Aid Overview Notifications).
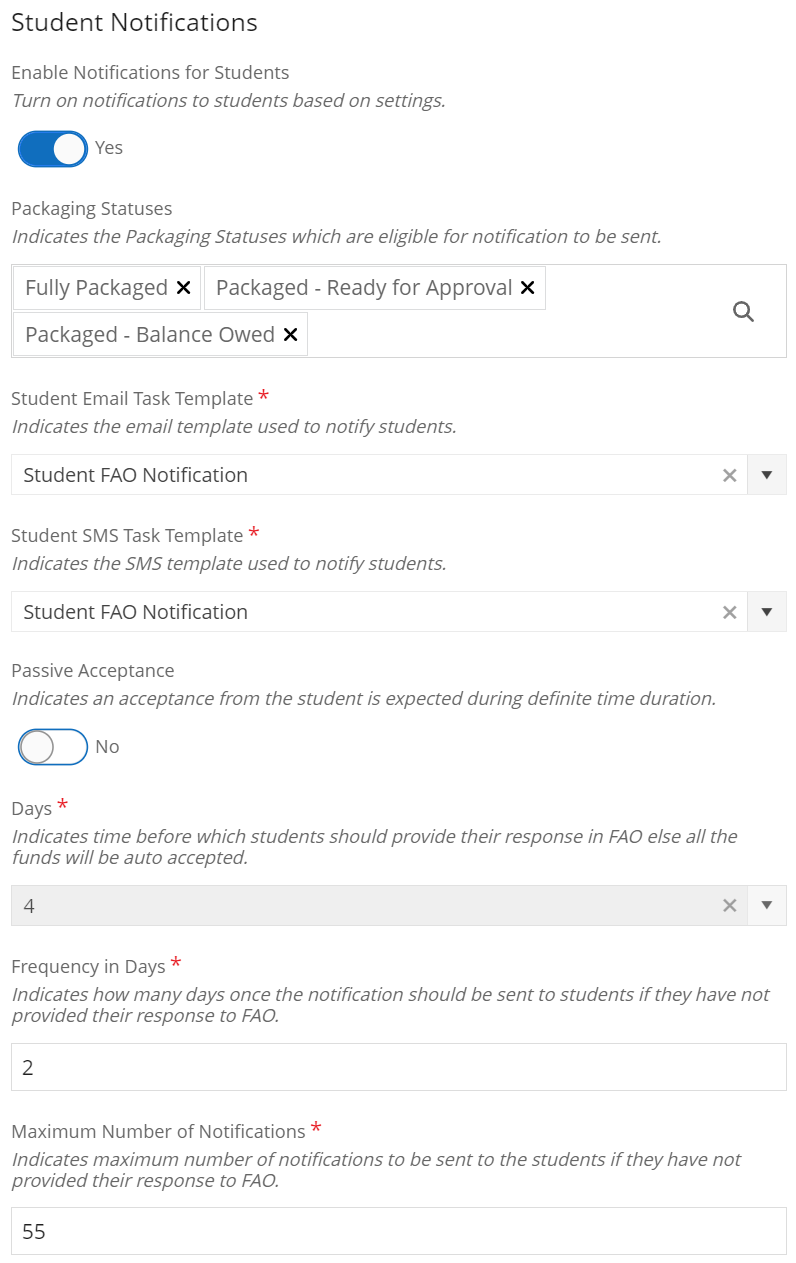
-
Under Enable Notifications for Students, select Yes or No to indicate whether the configuration options should be enabled.
-
In the Packaging Statuses field, select one or more values from the list of active packaging statuses.
-
In the Student Email Task Template field, select the email template to use when generating the event.
-
In the Student SMS Task Template field, select the SMS template to use when generating the event.
-
Under Passive Acceptance, select Yes or No to indicate whether acceptance from the student is expected during a definite time duration. The default is No. If you enable Passive Acceptance, the Frequency and Maximum Number of Notifications fields will be disabled.
-
In the Days field, specify the number of days before which students should provide their response on the Financial Aid Overview page. If students don't respond within the specified time, the funds will be automatically accepted. The minimum value is 1, the maximum is 10, and the default is blank.
-
In the Frequency in Days field, specify the number of days after which the notification is resent to students if they have not provided their responses. The minimum value is 1.
-
In the Maximum Number of Notifications field, specify the maximum number of notifications to be sent to the students if they have not provided their responses. Valid values are 1 - 99.
-
-
Select Save in the toolbar at the top of the page to save your changes on the Notifications tab.
